Renault Kangoo
Headlights: changing bulbs
Vehicles with halogen headlights
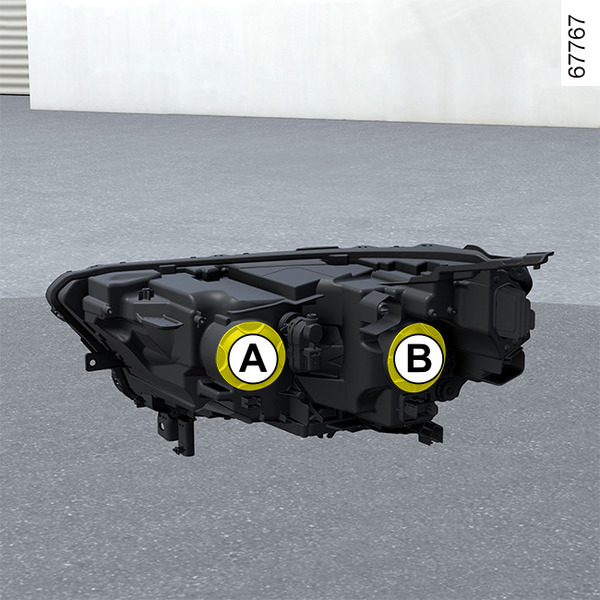
Dipped beam headlights
Remove the cover A.
Move the bulb holder 1 to unclip it and replace the bulb.
Bulb type: H7.
After replacing the bulb, please ensure that the lights are adjusted by a professional.

Main beam headlights
Remove the cover B.
Move the bulb holder 2 to unclip it and replace the bulb.
Bulb type: H7.
Do not touch the bulb glass. Hold it by its base.
It is essential to use anti-U.V.55W bulbs so as not to damage the plastic on the headlights. Mark the bulb’s position before removal to ensure correct positioning when replacing.
When the bulb has been changed, make sure you refit the cover correctly.
tip
To comply with current legislation, or as a precaution, you can obtain an emergency kit from your approved dealer containing a set of spare bulbs and fuses.
warning
The bulbs are under pressure and may break when replaced.
Risk of injury.
warning
Please note when working close to the engine that it may be hot. The engine cooling fan may also start at any moment. The
![]() label in the engine compartment reminds you of this.
label in the engine compartment reminds you of this.
Risk of injury.

LED front side lights, daytime running lights 3
Consult an approved Dealer.
LED direction indicator lights 4
Consult an approved Dealer.
LED headlights

LED front side lights, daytime running lights 5
Consult an approved Dealer.
LED main beam headlights, dipped beam headlights 6
Consult an approved Dealer.
LED direction indicator lights 7
Consult an approved Dealer.
LED front fog lights 8
Consult an approved Dealer.
warning
Before carrying out any operation in the engine compartment, you must switch off the ignition.
warning
Any operation on (or modification to) the electrical system must be performed by an approved Dealer since an incorrect connection might damage the electrical equipment (harness, components and in particular the alternator). In addition, your Dealer has all the parts required for fitting these units.
Rear lights and side lights: changing bulbs
Direction indicator lights, reversing lights, fog lights and brake lights

To remove the light, loosen the bolts 1.
warning
The bulbs are under pressure and may break when replaced.
Risk of injury.

Release the light assembly from outside the vehicle by pulling towards the rear.
Remove the bulb holder 3 by unlocking the clips 2.
Refitting
To refit, proceed in the reverse order, taking care not to damage the wiring, and to fasten the clips 2 of the bulb holder 3.

- 4.
Brake light
Bulb type 4: P21W or, depending on the vehicle, PR21W.
- 5.
Reversing light
Bulb type 5: W16W.
- 6.
Indicator light
Bulb type 6: PY21W.
- 7.
Fog light
Bulb type 7: P21W.
tip
To comply with current legislation, or as a precaution, you can obtain an emergency kit from your approved dealer containing a set of spare bulbs and fuses.
LED side lights 8

Consult an approved Dealer.
High-level LED brake light 9

Consult an approved Dealer.
LED number plate lights 10
(depending on the vehicle)

Consult an approved Dealer.
Number plate light

Unscrew the bolt 11.
Remove the light cover 12 to access the bulb.
Bulb type : W5W.
LED side indicator lights 13

Consult an approved Dealer.
Side indicator lights 14

As the door mirror shell needs to be removed, we advise you to have the bulb replaced by an approved dealer.
To access the bulb:
- carefully unclip the door mirror shell 15 from its base 16 (movement A);
- disengage the bulb holder 17 using a flat-blade screwdriver or similar, levering at C (movement B);
- disengage and remove the bulb holder 17 then replace the bulb 18.

Bulb type: WY5W.
To refit it, carry out the above operations in reverse order.
Make sure:
- that the bulb holder 17 is aligned correctly before inserting it into its housing;
- that the door mirror shell 15 clips properly onto its base 16.
When disassembling and refitting, ensure that the wiring and the surrounding components are not damaged.

