Renault Master 3 phase 1


If any electrical component does not work, check the condition of the fuses.
Remove the fuse using tweezers 1, located at the back of flap A.
To remove the fuse from the tweezers, slide the fuse to the side.
It is not advisable to use the free fuse locations.
Your vehicle is equipped with two fuse boxes: in the passenger compartment and in the engine compartment.
Fuses in the passenger compartment
Unclip flap A using notch B to help you.
To identify the fuses, refer to the fuse allocation label (see the next page for details), located on the rear of flap A.
To comply with legislation, or as a precaution, you can obtain an emergency kit containing a set of spare bulbs and fuses from an approved dealer.
Check the fuse in question and replace it, if necessary, by a fuse of the same rating.
If a fuse is fitted where the rating is too high, it may cause the electrical circuit to overheat (risk of fire) in the event of an item of equipment using an excessive amount of current.
Allocation of fuses (DEPENDING ON THE EQUIPMENT LEVEL)
Numbers | Allocation | Numbers | Allocation | Numbers | Allocation | ||||
|---|---|---|---|---|---|---|---|---|---|
î
| Radio, heated seats, multifunction display, sockets for audio and alarm connections.
| Z | Brake lights, interior lighting.
| | Cornering lights.
| ||||
Ä
| Passenger compartment ECU.
| | Hands-free access.
| ||||||
ë
| Accessories sockets. | ß
| Brake lights.
| £
| Tachograph.
| ||||
Æ
| Cigar lighter.
| ‚
| Electric windows, heating and air conditioning system and passenger compartment ECU.
| y
| Heating and air conditioning system fan.
| ||||
a
| Instrument panel.
| 8
| Left-hand heated rear screen.
| | Additional adaptations.
| ||||
N
| Central door control. | 7
| Right-hand heated rear screen.
| h
| Electric windows and passenger compartment ECU.
| ||||
D
| Passenger compartment ECU, direction indicator lights and rear fog lights. | l
| Windscreen washer.
| ||||||
0
| Engine immobiliser.
| ||||||||
Î
| Diagnostic socket.
| ñ
| Heated seats.
| ||||||
n | ABS/ESC
|

Fuses in the engine compartment
Removing fuse box C
Remove screw 2 and remove coolant reservoir 3.
No operations should be carried out on the cooling circuit when the engine is hot.
Risk of burns.
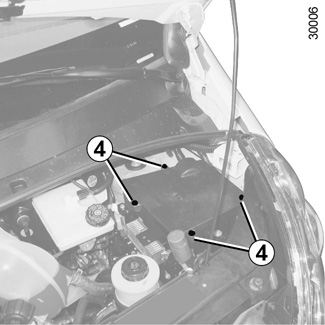
Unscrew the four screws 4.
Please note when working close to the engine that it may be hot. The engine cooling fan may also start at any moment. The warning light in the engine compartment reminds you of this.
Risk of injury.

Turn unit 5 over to access the fuses in the engine compartment.
To identify the fuses, refer to the fuse allocation label (see the next page for details), located on unit 5.
Check that no water or dust enters unit 5 when it is being removed/refitted.
Deactivate the Stop and Start function for any operation performed in the engine compartment.

Refitting fuse box C
Clip the mountings 7, then clip mounting 6.

Screw the four screws 4 to ensure that unit 5 is completely sealed.
Check that no water or dust enters unit 5 when it is being removed/refitted.

Position coolant reservoir 3, then screw bolt 2.
Allocation of fuses (DEPENDING ON THE EQUIPMENT LEVEL)
Symbol | Allocation | Symbol | Allocation | ||
|---|---|---|---|---|---|
V
| Right-hand side light.
| P | Right-hand main beam headlight.
| ||
Y
| Left-hand side light. | n | ABS
| ||
T
| Right-hand dipped beam headlight.
| f
| Windscreen wiper.
| ||
L
| Left-hand dipped beam headlight.
| t
| Heating and air conditioning system.
| ||
G
| Fog light | d | De-icing.
| ||
Q
| Left-hand main beam headlight. | ||||