Renault Boreal
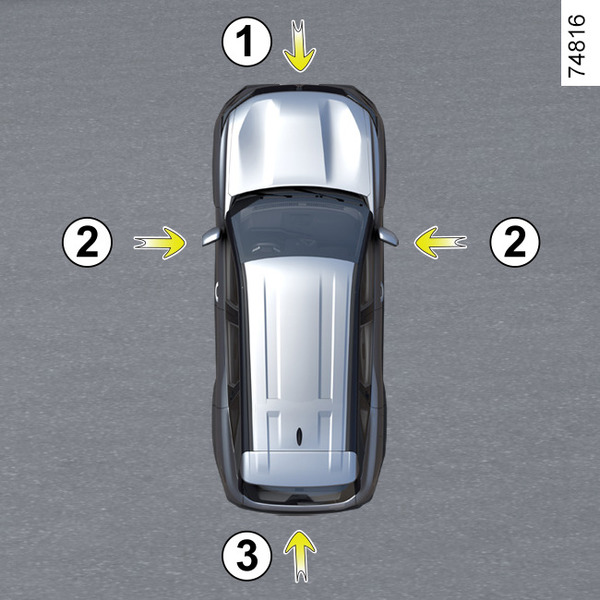

If installed on the vehicle, the four cameras (1, 2 and 3) on the front bumper, door mirrors and boot lid help during difficult manoeuvres.
Together with ultrasonic detectors (4) located in the vehicle's bumpers, the feature facilitates difficult manoeuvres (e.g. parking) by displaying the vehicle's surroundings.
warning
This function is an additional aid. It cannot, therefore, under any circumstances replace the vigilance or the responsibility of the driver.
The driver should always be prepared for sudden accidents while driving: when manoeuvring always check that there are no movable, small or narrow obstacles (such as children, animals, prams, bicycles, stones, posts, etc.) in your blind spot.
Operation
The cameras transmit four separate views on the multimedia screen 5 .

These cameras allow you to view the vehicle's surroundings:
Front view: through camera 1 ;
Rear view: through camera 3 ;
Top view: through cameras 1, 2 and 3;
Front and side rear view: through camera 2;
3D view;
tow view.
Ultrasonic sensors detect obstacles behind and (depending on the vehicle) to the side and front.
Note: make sure that the cameras are not obstructed (by dirt, mud, snow, condensation, etc.).
Front camera 1

The front camera view is presented on the multimedia screen 5.
Rear camera 3

The rear camera view is presented on screen 5.

The "front" view or the "rear" view relayed on the multimedia screen 5 is accompanied by one, two or three templates 6, 7 and 8.
This system is used with one or more templates (mobile and trailer for the trajectory, fixed for the distance).
Fixed guidelines 6
The fixed area includes colour marks A, B and C, which indicate the distance behind the vehicle:
- A (red) approximately 30 cm from the vehicle;
- B (yellow) approximately 70 cm from the vehicle;
- C (green) approximately 150 cm from the vehicle.
tip
The image on the multimedia screen may appear to be moving faster than is actually the case.
Mobile guidelines 7
(depending on the vehicle)
This information is shown in blue on the multimedia screen 5. It indicates the vehicle trajectory according to the position of the steering wheel.
Trailer template 8
This information is shown in blue on the multimedia screen 5. This indicates the vehicle trajectory according to the position of the steering wheel. This allows the driver to position the trailer as close as possible to the towbar.
tip
The screen displays a reverse mirror image.
The frames are a representation projected onto a flat surface. This information should not be considered when superimposed on a vertical object or an object on the ground.
Objects which appear on the edge of the screen may be deformed.
In very bright light (snow, vehicle in sunshine etc.), the camera vision may be adversely affected.
If the boot is open or incorrectly closed, the "Tailgate open" message is displayed.
warning
In front or back view: When performing manoeuvres on a slope, the objects displayed on the multimedia screen may be closer or further away than they appear.
Take this into account in order to correctly assess the distance before any manoeuvre.
warning
In the combined representation of the cameras:
elevated objects (pavement, vehicle, etc.) may appear misshapen in the bird's eye view;
objects on top of the vehicle are not displayed.
Side camera 2

The camera mounted on the exterior mirror transmits a side view on the multimedia screen 5.
Depending on the vehicle, it is possible to use the multimedia screen to switch from bird's-eye view to front-side view.
For more information, see the multimedia system user manual.
Bird's-eye view

The top view is a combined representation of cameras 1, 2 and 3.
It displays a view of the top of the vehicle and its surroundings.
This view can be used to confirm a view of the vehicle's position relative to its immediate surroundings (front, rear and side).
In "bird's-eye view" mode, the objects presented on the multimedia screen are actually further away than they appear.
Take this into account in order to correctly assess the distance before any manoeuvre.
Side views

On the multimedia screen, by pressing the specific button 9 it is possible to obtain a combination of "bird's-eye view" and two side views.
Panoramic front view or panoramic rear view

On the multimedia screen, by pressing the specific button 10, it is possible to get a panoramic front view.
When reverse gear is engaged, the panoramic front view is replaced by a panoramic rear view.
Note: The front view or rear view varies depending on the angle of the steering wheel in order to improve the driver's vision.
3D view

On the multimedia screen, by pressing the specific button 11, it is possible to obtain a 3D view that allows you to see the vehicle and its surroundings in three dimensions.
Trailer view

When driving forwards, if there is a trailer attached, press the "360° Camera" menu in the "Vehicle" world of your multimedia screen 5 so that the camera 3 transmits a view of the rear environment for approximately 30 seconds.
On the multimedia screen, when the "360° Camera" system is displayed, you can change the views (e.g. replace the rear view with the panoramic rear view).
Obstacle detection

With the system activated, if the "Park Aid" function detects one or more obstacles around the vehicle, the indicator lights 6 come on:
in bird's-eye view;
in front-side view on the passenger side (depending on the vehicle).
In addition to the audible alert, these indicators show the proximity of obstacles through different colors:
Green: obstacle at a distance of approximately 50 to 70 cm;
Yellow: obstacle at a distance of approximately 30 to 50 cm;
Red: obstacle at a distance of less than approximately 30 cm.
These indicators also show the location of the obstacles detected, as indicated by their respective positions in relation to the "Vehicle" symbol.
"Auto zoom" function

If an obstacle is detected near the front or rear of the vehicle, the "Auto zoom" function switches the current display to a specific view (top view, front view or rear view).
To enable or disable the function, refer to the multimedia instructions.
Activation/deactivation
Automatic mode
With the vehicle stationary and the engine running, automatic mode is activated when reverse gear is engaged. The rear view and "bird's-eye view" are presented on the multimedia screen 5.
When quickly shifting from reverse to a forward gear ratio, the rear view and top view are replaced by the front view and top view on the multimedia display 5.
Automatic mode is disabled:
when the gear lever is in the N or P position for approximately three seconds;
when the speed of the vehicle in forward gear exceeds 6 mph.
when the vehicle speed in reverse exceeds 10 mph (15 km/h).
Manual mode
To activate manual mode, with the vehicle stationary and the engine running, in the "Vehicle" universe on the multimedia screen 5, press the "360° camera" menu and front view and "bird's-eye view" will be displayed on the multimedia screen.
The manual mode is deactivated when:
when the speed of the vehicle in forward gear reaches 6 mph.
when the vehicle speed in reverse exceeds 10 mph (15 km/h).
if the gear lever is not used for approximately three minutes.
warning
Do not use this function with the exterior mirrors in the retracted position.
Make sure the boot lid is properly closed before using the function.
Do not place objects on or in front of the cameras.
Setting the display
On the multimedia screen, when the "360° Camera" system is presented, you can change the view (for example, replace the panoramic view with the side rear view).
warning
For safety reasons, only adjust the settings when the vehicle is stationary.
If the gear lever is in the R position, the following views are available:
Screen shared between rear view and bird's-eye view;
or
Screen shared between rear view and front side view (depending on the vehicle).
When shifting from reverse to the P position, the following views will be available:
Screen shared between rear view and bird's-eye view;
or
Screen shared between rear view and front side view (depending on the vehicle).
When shifting from reverse to the D position, the following views will be available:
Shared screen between front view and "bird's-eye view";
or
Screen shared between front view and front side view (depending on the vehicle).
Difference between the estimated distance and the actual distance
Driving or reversing towards a steep uphill slope

The fixed guide lines 5 show distances as shorter than in reality.
The objects shown on the screen are actually further away on the slope.
For example, if the screen displays an object at F, the actual distance of the object will be at G.
Driving or reversing towards a steep downhill slope

The fixed guide lines 5 show distances as further away than in reality.
However, the objects shown on the screen are actually closer on the slope.
For example, if the screen displays an object at J, the actual distance of the object will be at H.
Driving or reversing toward a protruding object

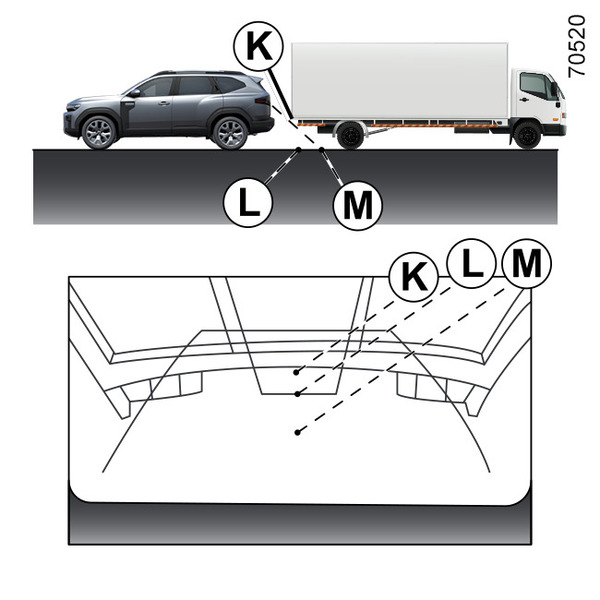
Position K appears to be further away than position L on the screen. However, position K is at the same distance as position M.
The trajectory indicated by the fixed and mobile guide lines does not take into account the height of the object. Therefore, there is a risk that the vehicle will collide with the object while reversing towards position M.